Ever installed a WordPress plugin “just to try it out” and then… completely forgot? It happens! Plugins can pile up surprisingly fast. But those old, unused add-ons can quietly slow down your site, open up security holes, and make things messier behind the scenes.
This week’s Lil Bit Better tip is all about clearing your plugin clutter.
Why Removing Unused Plugins Matters
Unused plugins can impact your site in a few ways:
- Storage and backups: Even when inactive, plugins take up disk and database space. That means your backups can take longer, and restoring them may be slower (especially if you’re on a tight hosting plan).
- Database clutter: Some plugins leave “autoload” data in your database even when deactivated, which can marginally affect performance if left to accumulate. Autoload, if you didn’t know, is basically bits of info that WordPress loads on every page.
- Security risk: Outdated or abandoned inactive plugins might contain vulnerabilities that hackers can exploit, putting your site at risk even if you aren’t actively using them.
- Minor admin overhead: WordPress checks basic info about inactive plugins when loading your admin list, but the impact on speed is minimal.
- General clutter: This one’s more of a personal pet peeve. I hate going into the back end of a site and seeing mess. Unused plugins just add to that visual clutter.
Inactive plugins are digital dead weight. They might not slow down your pages directly, but they clutter your site, increase maintenance, and raise security risk. Deleting what you don’t need is best practice for a cleaner, safer, faster website.
How to Identify Unused Plugins
Okie so now we know why unused plugins aren’t good, but how do you go about identifying unused plugins?
In your WordPress dashboard, go to Plugins > Installed Plugins. This page lists every plugin on your site, and at the top you’ll see filters for Active, Inactive, and sometimes Recently Active.

Step 1: Check inactive plugins (the low-hanging fruit)
Start with the Inactive list. These are plugins that are installed but not currently running. It’s usually safe to assume they’re not in use… but not always.
Sometimes a plugin is only deactivated temporarily while testing or troubleshooting. If you’re the only one managing the site, you’ll know straight away if something was turned off intentionally (e.g. “I disabled that new form plugin last week while testing another one”).
If you work with other people, though, check with them first before deleting anything. You don’t want to remove something they’re actively using or testing.
Step 2: Review active plugins
Once your Inactive list is tidy, move on to your Active plugins. Just because a plugin is active doesn’t mean it’s actually being used.
Ideally you should know exactly what every plugin on your site does. But let’s be honest that’s definitely not always the case. I’ve worked on sites where multiple plugins were installed that did all the same thing but only one was actually needed (my record was 4 form plugins!).
This is where an audit comes in handy. Go through your active plugins one by one and note:
- What it does and whether it’s essential (e.g. if your website is built using Elementor page builder, you don’t want to delete that as your entire site layout will break).
- Whether it’s set up or just sitting there half-configured (also very common when people are testing things out)
- If there’s another plugin already handling that functionality (see above where I once had a site that had FOUR form plugins installed!)
If you’re unsure if a plugin is being used you can check a couple of ways.
- Check the plugin’s settings to see if it’s been setup/configured.
- Check on the website to see if the plugin is actually doing its job. e.g. if you have a form plugin installed but you don’t have a form on the frontend of the site then it’s probably not being used.
- Lastly… when in doubt, test it! Ideally you want to do this on a staging site… buuuuut if you’re brave (or a “cowboy coder”), you can temporarily deactivate it on your live site and see if anything breaks.
Bonus tip: Keep a plugin log
I’m a spreadsheet girlie, so I like to track my plugins in a simple sheet (plugin name, use, and whether it’s required for critical functionality). It makes future audits super easy and fast because you can quickly spot what’s essential and what’s just hanging around.
Pro tip: Audit your plugins regularly. Keeping your list clean saves time, improves performance, and makes maintenance a breeze.
What To Do Before Deleting
Once you’ve identified which plugins need to be removed you obviously need to delete them.
- Back up your site first: Please refer to my recent blog post about Website Backups for why this is important. But ideally your host has backups included so you can quickly backup everything before you start making any changes.
- Check for uninstall options: Some plugins include a built-in uninstall process in their settings to remove extra data cleanly. For most, simply clicking Delete works fine, just double-check before removing complex tools like security or ecom plugins. Don’t worry they’ll walk you through the steps to do this.
- Optional: tidy the database: Some plugins leave traces in your database. If you want a deeper clean, use tools like WP-Optimize to remove anything leftover but for most sites, a standard delete is perfectly fine.
How to Remove an Unused Plugin
If you’re read this far in the blog you’ve probably worked this out by now but below is the simple step by step process on how to delete a plugin is:
Step 1: From your WordPress dashboard go to Plugins > Installed Plugins.
Step 2: Find the plugin you need to delete and click Deactivate (if it isn’t already).
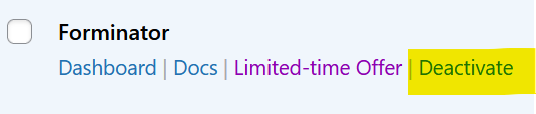
Step 3: Once deactivated, the Delete button will appear. Click this to delete/remove the plugin.

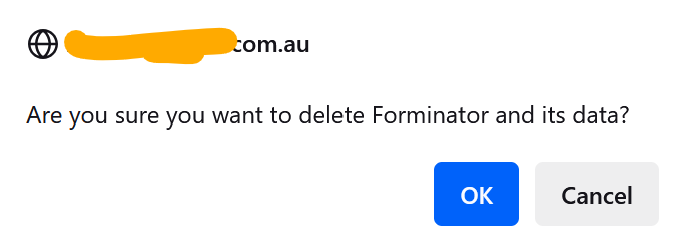
Step 4: You’ll be prompted with some form of a ‘are you sure you want to delete’ message. Click ok!
As mentioned above some plugins will have an extra few steps for deactivating and uninstalling but it will walk you through this.
Quick tip: If you’re clearing out a few plugins at once you can bulk delete them by ticking the checkboxes next to them and selecting Delete from the Bulk Actions dropdown, and clicking Apply.
Mistakes to Avoid
- Deleting something important: If you’re unsure, deactivate first and give it a few days before deleting.
- Skipping the backup: Always back up first, even if you’re confident.
- Ignoring leftovers: Most plugins delete cleanly, but advanced users can tidy up leftover database entries later if needed.
Make Your Website a Lil Bit Better
Now that you’re official an “unused plugin expert” (yes I’ve decided that’s a thing). Your task this week to make your website a lil bit better is to go delete your unused plugins.
Wrap Up
That’s it! Removing unused plugins is a five-minute win for a faster, safer, easier-to-manage WordPress site.
Want more quick wins? Subscribe to the Lil Bit Better email for bite-sized weekly tips to keep your site in top shape.
Or if you’d rather someone else handle all the plugin updates, backups, and cleanups my Website Care Plans have you covered.